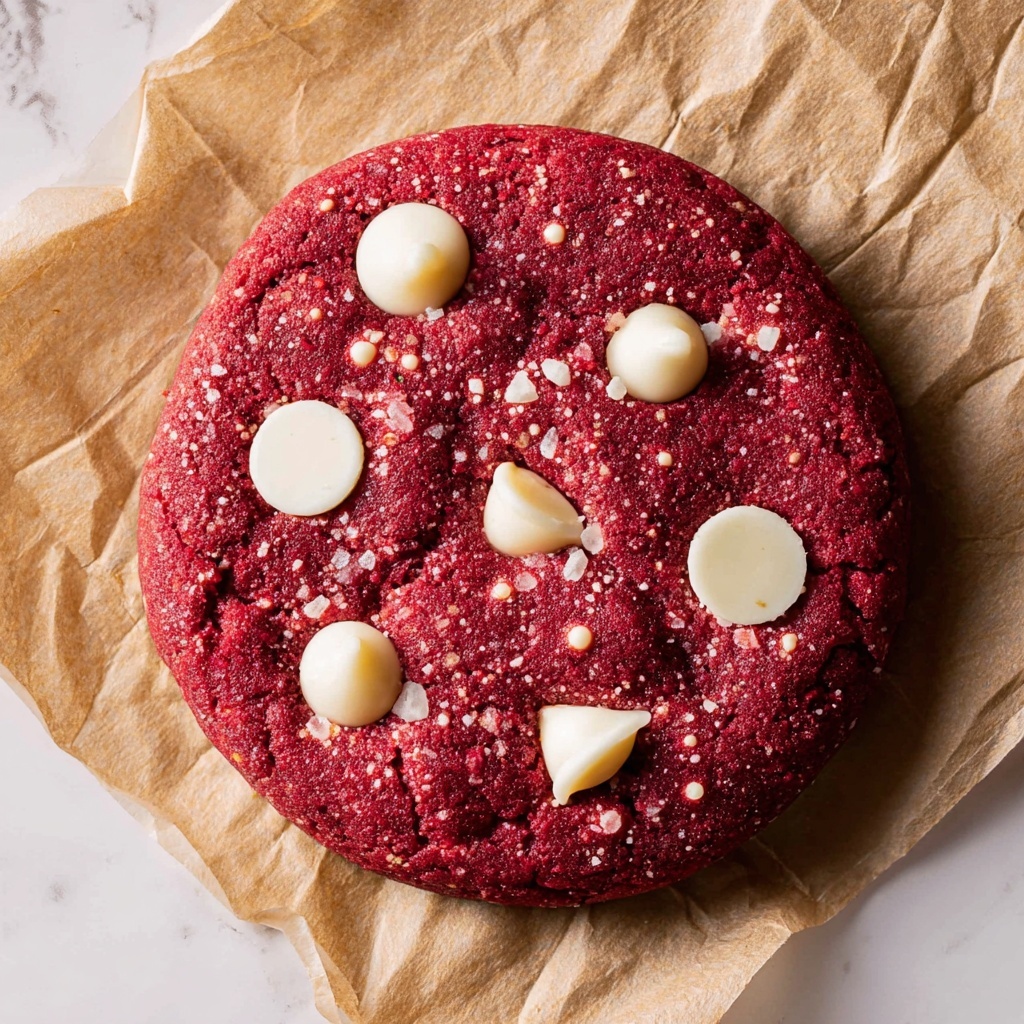
If you adore the rich, velvety flavor of classic red velvet cake but want a fun, handheld twist, then this Red Velvet Cookies Recipe is about to become your absolute favorite. These cookies are a divine blend of cocoa and red dye, loaded with chunks of creamy white chocolate that melt beautifully with every bite. Soft, chewy, and irresistibly festive, these treats strike the perfect balance between cake and cookie, making them a standout addition to any cookie jar or holiday spread. Once you try this Red Velvet Cookies Recipe, you’ll understand why it’s captured hearts and taste buds alike!
Ingredients You’ll Need
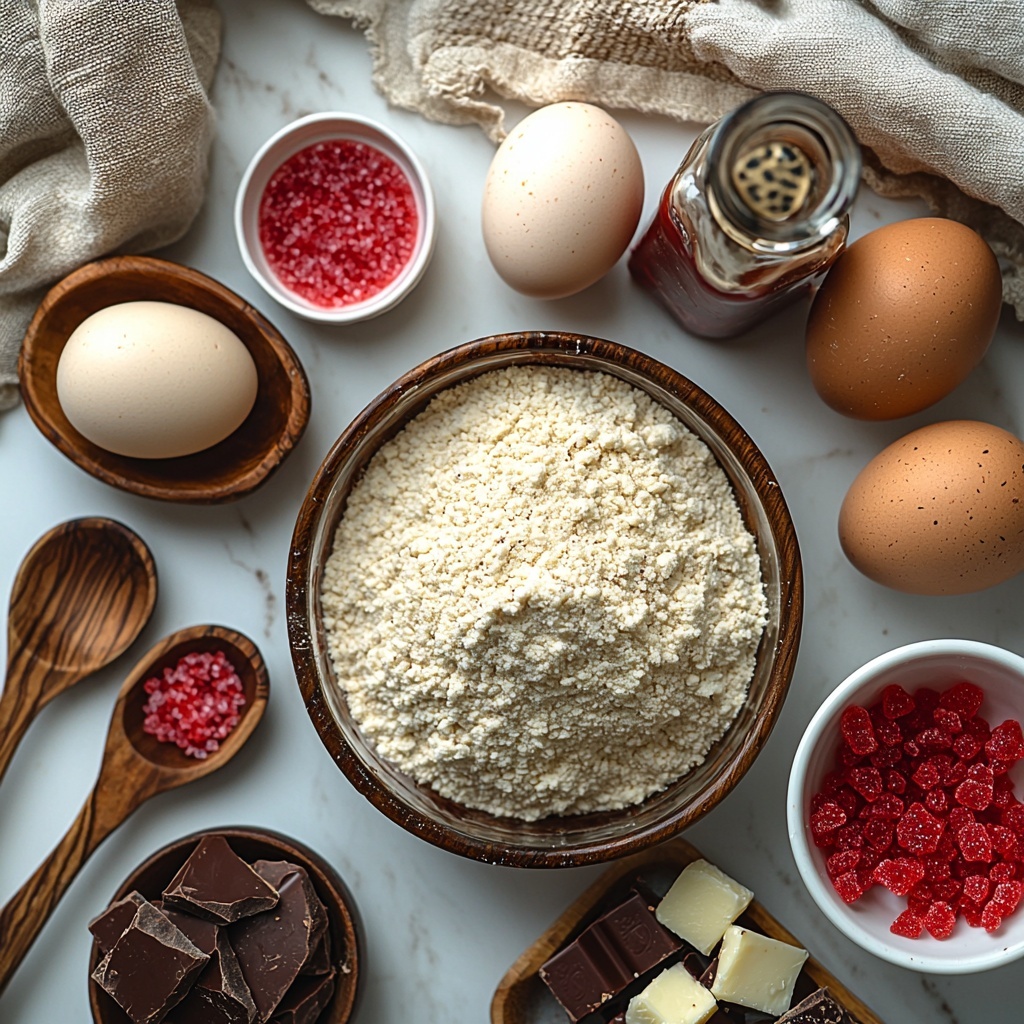
Getting the perfect balance of texture and flavor starts with simple, quality ingredients that work together harmoniously. Each component plays an essential role—from the cocoa powder lending that signature chocolate hint to the white chocolate chunks adding bursts of creamy sweetness.
- 2 1/2 cups All-purpose flour: The foundation that gives your cookies structure and softness.
- 1/4 cup Unsweetened cocoa powder: Adds the subtle chocolate flavor classic to red velvet.
- 1 tsp Baking soda: Helps the cookies rise and achieve the right texture.
- 1 tsp Salt: Balances sweetness and enhances all other flavors.
- 1 cup Unsalted butter (melted and cooled): Gives richness and moisture for a tender bite.
- 3/4 cup Brown sugar (packed light or dark): Provides deep caramel undertones and chewiness.
- 3/4 cup White granulated sugar: Adds sweetness and contributes to the cookies’ crisp edges.
- 2 Large eggs (room temperature): Binds everything together and ensures a moist crumb.
- 1 tsp Pure vanilla extract: Brings warmth and enhances the overall flavor profile.
- 1 tsp Red velvet dye (gel, like Americolor super red): The secret to that vibrant, eye-catching color.
- 1 1/2 cups Chopped white chocolate: Melts inside the cookies, creating delightful pockets of sweetness.
- Red decorating sugar: Used for rolling the dough balls to add sparkle and a sweet crust.
How to Make Red Velvet Cookies Recipe
Step 1: Mix the Dry Ingredients
Start by sifting together the all-purpose flour, unsweetened cocoa powder, baking soda, and salt into a medium bowl. This ensures your cocoa blends evenly and your cookies have a light texture without any clumps. Also, chop the white chocolate into medium-sized pieces if you’re not using chips—these chunks will melt just right inside the cookies.
Step 2: Beat the Butter and Sugars
In a mixer, combine the melted and cooled butter with both the brown and white granulated sugars. Beat on high speed for about 2 minutes until the mixture turns lighter in color and looks creamy. This step is crucial because it aerates the butter and sugar, which helps your cookies have a tender yet slightly crisp edge.
Step 3: Add Wet Ingredients and Color
Next, add the eggs, pure vanilla extract, and that gorgeous red velvet gel dye to the sugar-butter mixture. Mix everything until it’s fully combined for a uniform, bright red dough. This step brings all the flavor and visual charm together—don’t be shy with the gel dye for the best color!
Step 4: Incorporate Dry Ingredients and White Chocolate
Pour the dry ingredient mixture into your wet ingredients and mix on low speed just until everything comes together; overmixing can make the cookies tough. Once mixed, fold in the chopped white chocolate gently by hand. This prevents the chocolate pieces from breaking up and ensures they stay nice and chunky.
Step 5: Chill and Prepare for Baking
Preheat your oven to 350°F and line two cookie sheets with parchment paper. Let the dough rest for 10 to 15 minutes while the oven warms up; this little pause helps prevent the cookies from spreading too much while baking, resulting in a thicker, softer bite.
Step 6: Scoop, Roll, and Bake
Use a large cookie scoop (around 3 tablespoons) to portion out the dough. Roll each dough ball generously in red decorating sugar for a festive and sweet crust. Place six dough balls on each cookie sheet to give them room to bake evenly. Bake one sheet at a time for 13 to 15 minutes, then immediately top the warm cookies with a few extra white chocolate chips if you want to add an elegant finishing touch.
Step 7: Cool and Enjoy
Allow the cookies to cool on the baking sheet for about 5 minutes before transferring them to a wire rack to cool completely. This easy step helps the cookies set perfectly so they don’t crumble when you pick them up—making sure every bite is pure joy.
How to Serve Red Velvet Cookies Recipe
Garnishes
Sprinkle a pinch of powdered sugar or add a dollop of cream cheese frosting on the side to complement the red velvet flavor. White chocolate drizzles or extra red decorating sugar also make these cookies look and taste extra special.
Side Dishes
Pair these cookies with a cold glass of milk or a cup of freshly brewed coffee or hot cocoa for a cozy, comforting treat. They also go wonderfully alongside vanilla ice cream or a light fruit salad for a delightful dessert spread.
Creative Ways to Present
For festive occasions, stack them in a clear jar tied with a ribbon or arrange them on a tiered dessert stand for a show-stopping centerpiece. You can also sandwich them with cream cheese frosting to turn them into little red velvet cookie sandwiches that are almost too pretty to eat.
Make Ahead and Storage
Storing Leftovers
Keep your leftover Red Velvet Cookies Recipe cookies fresh by storing them in an airtight container at room temperature. They hold their softness for up to five days, making them perfect for prepping ahead for celebrations or weekday treats.
Freezing
If you want to keep these delicious cookies for longer, freeze the baked cookies by placing them in a single layer on a baking sheet first, then transferring them to a freezer-safe bag or container once frozen solid. They’ll keep well for up to three months.
Reheating
To enjoy the cookies warm, simply microwave a cookie for 10 to 15 seconds or warm in a low oven (around 300°F) for 5 minutes. This gives the white chocolate pieces that freshly baked gooey goodness again and revives their soft texture.
FAQs
Can I substitute the white chocolate chunks with something else?
Absolutely! You can swap white chocolate for dark or milk chocolate chunks, or even chopped nuts if you want to add a crunchy texture. Just keep in mind that each substitute will subtly change the cookie’s flavor profile.
Why do the cookies need to rest before baking?
Letting the dough rest while your oven preheats helps the cookies hold their shape better and prevents over-spreading. This rest time allows the flour to hydrate and the butter to firm up slightly for the perfect texture.
Can I use liquid red food coloring instead of gel?
Gel food coloring is recommended because it provides vibrant color without altering the dough’s consistency. Liquid color can make the dough too wet, which affects texture and spreading during baking.
What if I don’t have baking soda? Can I use baking powder?
Baking soda is crucial for the right rise and texture here due to the acidic elements in red velvet recipes. Baking powder isn’t a direct substitute and may lead to different results, often less chewy cookies.
How do I keep my cookies soft and chewy?
Be careful not to overbake your red velvet cookies and allow them to cool on the baking sheet briefly before moving to a wire rack. Also, the melted butter and brown sugar contribute a lot to that chewy texture, so make sure to measure accurately!
Final Thoughts
There’s something truly magical about this Red Velvet Cookies Recipe—combining the velvety richness of cake with the ease and fun of cookies. Whether you’re baking for a special occasion or just to treat yourself, these cookies will bring an extra smile to your day. I can’t wait for you to try them out and make them a highlight of your baking repertoire!
Print
Red Velvet Cookies Recipe
- Prep Time: 15 minutes
- Cook Time: 15 minutes
- Total Time: 34 minutes
- Yield: 14 servings (14 large cookies)
- Category: Dessert
- Method: Baking
- Cuisine: American
Description
Delight in these chewy and vibrant Red Velvet Cookies that combine the classic flavors of red velvet cake with the convenience of a cookie. Packed with white chocolate chunks and rolled in festive red decorating sugar, these cookies offer a perfect balance of sweetness, texture, and a striking appearance for any occasion.
Ingredients
Dry Ingredients
- 2 1/2 cups All-purpose flour
- 1/4 cup Unsweetened cocoa powder
- 1 tsp Baking soda
- 1 tsp Salt
Wet Ingredients
- 1 cup Unsalted butter (melted and cooled)
- 3/4 cup Brown sugar (packed, light or dark)
- 3/4 cup White granulated sugar
- 2 Large eggs (room temperature)
- 1 tsp Pure vanilla extract
- 1 tsp Red velvet gel dye (e.g., Americolor super red)
Add-ins and Toppings
- 1 1/2 cups Chopped white chocolate (e.g., Lindt white chocolate bars or white chocolate chips)
- Red decorating sugar (for rolling the cookies)
Instructions
- Prepare dry ingredients: In a medium bowl, sift together the all-purpose flour, unsweetened cocoa powder, baking soda, and salt. Set this mixture aside. Chop the white chocolate into medium-sized pieces for folding into the dough later.
- Mix butter and sugars: Using an electric mixer, beat the cooled melted butter with both the brown sugar and white granulated sugar on high speed for 2 minutes. This process lightens the color and helps incorporate air for a tender cookie texture.
- Add eggs and flavorings: Add the eggs, vanilla extract, and red velvet gel dye to the butter and sugar mixture. Mix until fully combined and the color is even throughout.
- Combine dry and wet ingredients: Pour the sifted dry ingredients into the wet mixture and mix on low speed just until combined. Avoid overmixing to maintain cookie tenderness. Then, fold in the chopped white chocolate by hand to evenly distribute the pieces.
- Preheat oven and rest dough: Preheat your oven to 350°F (177°C). Line two baking sheets with parchment paper. Allow the cookie dough to rest for 10-15 minutes while the oven preheats; this resting period helps prevent excessive spreading during baking.
- Shape and sugar coat cookies: Pour red decorating sugar into a bowl. Using a large cookie scoop (approximately 3 tablespoons or 2 ounces), scoop dough balls and roll each ball thoroughly in the red sugar to coat. Place about 6 cookie dough balls evenly spaced on each prepared baking sheet.
- Bake the cookies: Bake one cookie sheet at a time in the preheated oven for 13-15 minutes, until the cookies are set but still soft in the center.
- Optional topping: Immediately after removing cookies from the oven, optionally top each cookie with a few white chocolate chips for extra visual and flavor appeal.
- Cool the cookies: Let the cookies sit on the baking sheet for 5 minutes to firm up before transferring them to a wire cooling rack to cool completely.
Notes
- Using gel dye like Americolor super red ensures a vibrant red color without adding excess liquid.
- Resting the dough before baking helps to reduce spreading for thicker cookies.
- Be sure the melted butter is fully cooled before mixing to avoid cooking the eggs.
- Baking one sheet at a time ensures even heat distribution and consistent baking results.
- For a richer chocolate flavor, use darker cocoa powder but adjust sugar if needed.


