
There is something irresistibly charming about these Raspberry Jam Thumbprint Cookies Recipe that just makes your kitchen feel instantly cozy and festive. Imagine tender, buttery cookies with a delicate hint of raspberry powder baked right into the dough, each one boasting a jewel-like center of vibrant raspberry jam that bursts with fruity sweetness. This recipe perfectly balances buttery richness with a fresh tartness that’s simply addictive, making it a personal favorite to bake for every occasion or just an everyday treat to brighten your day. Trust me, once you try these, you’ll find yourself reaching for them again and again!
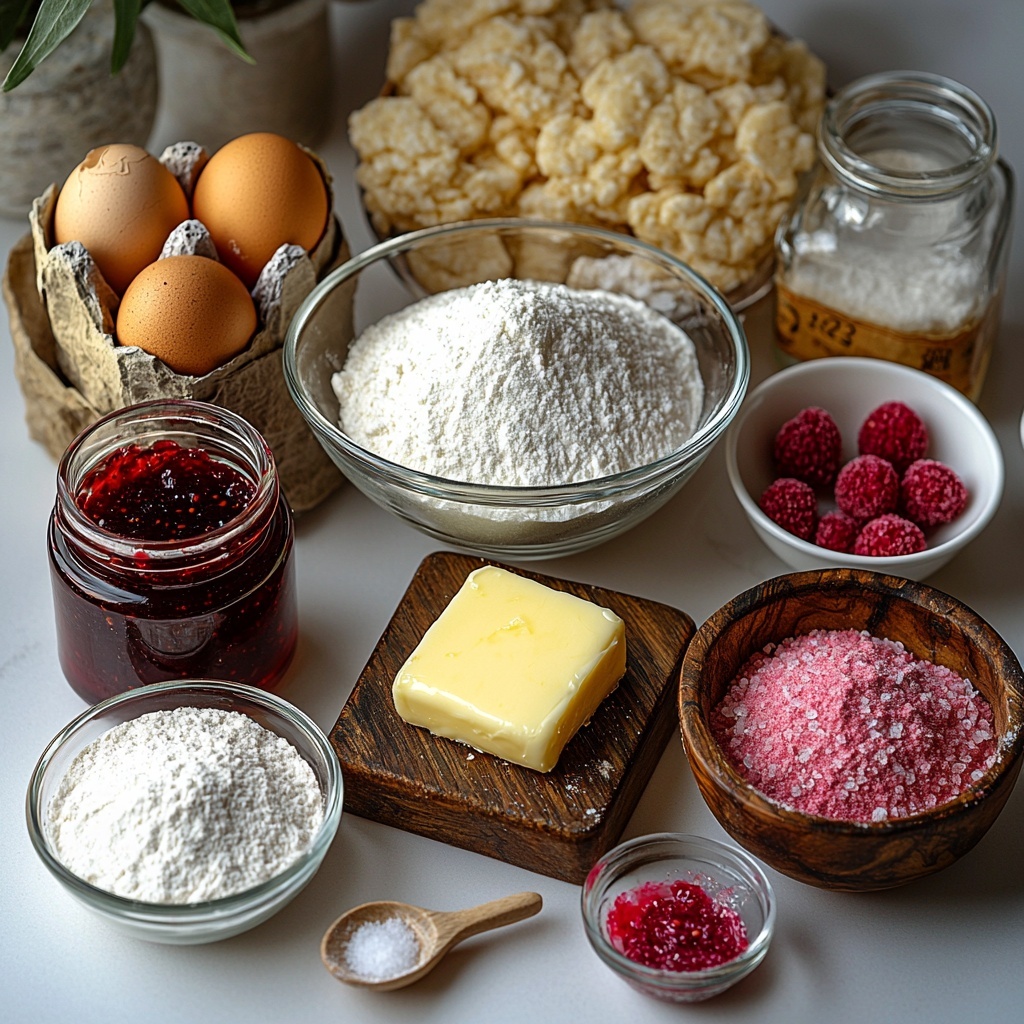
Ingredients You’ll Need
Gathering these ingredients is super easy because each one plays a crucial role in delivering the perfect flavor, texture, and beautiful raspberry hue to your cookies. From creamy butter to the magical raspberry powder, every item is essential, simple, and thoughtfully chosen.
- 1 cup unsalted butter, softened: Provides a rich, tender base that makes the cookies melt-in-your-mouth delightful.
- ⅔ cup granulated sugar: Sweetens the dough and helps achieve that lovely, light crumb and slight crispness.
- 2 egg yolks: Adds moisture and structure, ensuring the perfect cookie consistency.
- 1 teaspoon vanilla extract: Delivers warm, aromatic depth that enhances every flavor note.
- 2 ¼ cup (280g) all-purpose flour: Forms the sturdy yet tender framework of the cookie dough.
- ¼ teaspoon kosher salt: Balances sweetness and brightens the raspberry flavors beautifully.
- 4 tablespoons freeze dried raspberry powder, sifted: Infuses the dough with natural raspberry essence and a pretty pink tint.
- 10 oz raspberry jam: The luscious, fruity center that transforms these cookies into a delightful little jewel.
How to Make Raspberry Jam Thumbprint Cookies Recipe
Step 1: Cream the Butter and Sugar
Start by beating the softened butter and granulated sugar with an electric mixer until they’re light and fluffy, about 3 minutes. This step is key for creating that airy texture in the cookies that makes them so tender and buttery. You’ll see the mixture turn pale and creamy – that’s your cue that you’re on track!
Step 2: Mix in Egg Yolks and Vanilla
Next, add the two egg yolks and the vanilla extract to the buttery sugar mixture. Continue mixing until smooth and fully combined. The egg yolks not only enrich the dough but also help hold everything together gently without making it tough.
Step 3: Prepare Dry Ingredients
In a separate bowl, whisk together the all-purpose flour, kosher salt, and the sifted freeze dried raspberry powder. The raspberry powder is the secret touch that adds a subtle berry aroma and lovely pink speckles throughout the cookies.
Step 4: Combine Wet and Dry Ingredients
Add the dry ingredients to the wet ingredients in two batches. Mix gently, just until the dough comes together. Overmixing can make the cookies tough, so stop as soon as you see no flour patches remaining.
Step 5: Chill the Dough
Cover the bowl tightly and refrigerate the dough for 30 minutes. Chilling helps firm up the dough so it’s easier to handle and keeps your cookies from spreading too much as they bake, maintaining their charming shape.
Step 6: Preheat Oven and Prepare Sheets
While the dough chills, preheat your oven to 350 degrees Fahrenheit and line two baking sheets with parchment paper to prevent sticking and simplify cleanup.
Step 7: Shape the Cookie Dough Balls
Scoop about a tablespoon of dough at a time and roll it between your palms to create smooth balls. Then gently flatten each one slightly into a puck shape, preparing them for the signature thumbprint.
Step 8: Make the Thumbprint Indentation
Carefully press a small heart-shaped indentation into the center of each dough ball using your pinky or index finger. Press about three-quarters of the way through the dough ball, creating a perfect little nest for the jam.
Step 9: Fill with Raspberry Jam
Using a spoon or a piping bag, fill each indentation generously with raspberry jam, almost to the top. This jam is what gives these cookies that irresistible pop of color and flavor right in the center.
Step 10: Chill Before Baking Again
Put the jam-filled cookies back in the refrigerator for another 10 to 15 minutes. This extra chill helps them hold their shape beautifully while baking so your cookies stay neat and picture perfect.
Step 11: Bake Your Cookies
Bake for 10 to 12 minutes until the cookie bottoms are lightly browned. The tops may feel soft, but don’t worry – they will firm up as they cool. This careful baking ensures a tender bite with just enough crisp edges.
Step 12: Cool Completely
Transfer the cookies to a wire rack and let them cool completely before serving. This step allows the cookies to set perfectly, so every bite is tender, buttery, and bursting with that jammy center.
How to Serve Raspberry Jam Thumbprint Cookies Recipe
Garnishes
Sprinkle a little powdered sugar or some finely crushed freeze dried raspberries over the cookies right before serving for an elegant touch. A small mint leaf can also add a fresh pop of color and a subtle herbal note.
Side Dishes
These cookies pair wonderfully with a scoop of vanilla ice cream or a dollop of whipped cream for a tantalizing dessert experience. For a beverage, a rustic cup of black tea or a mild coffee perfectly complements the fruity sweetness.
Creative Ways to Present
Try arranging your Raspberry Jam Thumbprint Cookies Recipe on a pretty platter lined with fresh raspberry leaves or edible flowers to wow guests at a party. They also look charming stacked in a glass jar tied with a ribbon for gifting or special occasions.
Make Ahead and Storage
Storing Leftovers
Store your cookies in an airtight container at room temperature to keep them fresh and tender for up to five days. Placing a slice of bread inside the container can help maintain moisture and prevent them from drying out.
Freezing
These cookies freeze beautifully. Arrange them in a single layer on a baking sheet to freeze initially, then transfer to a sealed freezer-safe bag or container. They will keep well for up to three months and can be thawed gently at room temperature.
Reheating
If you want to refresh their just-baked warmth, pop the cookies in a low oven at 300 degrees Fahrenheit for about 5 minutes. This lightly softens the cookie and gives the jam a lovely, fresh-out-of-the-oven glow.
FAQs
Can I use fresh raspberries instead of raspberry powder?
While fresh raspberries offer fantastic flavor, they add extra moisture which may alter the cookie texture. Raspberry powder is ideal for adding concentrated flavor and color without changing the dough consistency.
Is it possible to substitute the raspberry jam with another fruit jam?
Absolutely! Strawberry, apricot, or even blueberry jam will work beautifully and offer a new twist while keeping the spirit of the Raspberry Jam Thumbprint Cookies Recipe alive.
Can I make these cookies gluten-free?
You can substitute the all-purpose flour with a gluten-free blend that measures cup-for-cup, but be sure it’s one designed for baking to maintain the right texture and structure.
Why do the cookies need to be chilled before and after shaping?
Chilling the dough helps prevent spreading by firming the fat, and chilling after filling ensures the jam doesn’t melt into the dough during baking, helping keep their shape neat and the centers intact.
How do I prevent the jam from overflowing during baking?
Make sure not to overfill the thumbprint cavities, and chilling the cookies after filling is essential. Also, use a thicker jam or preserve rather than a very runny jelly for best results.
Final Thoughts
These Raspberry Jam Thumbprint Cookies Recipe have a special way of making any day feel a little brighter and every gathering just a bit sweeter. Their perfect balance of rich, buttery dough and tart, fruity centers is simply unforgettable. If you love baking that fills your home with joy and delivers moments of pure deliciousness, this recipe is a must-try. I can’t wait for you to make these cookies your new classic favorite!
Print
Raspberry Jam Thumbprint Cookies Recipe
- Prep Time: 15 minutes
- Cook Time: 12 minutes
- Total Time: 1 hour
- Yield: 24 servings
- Category: Dessert
- Method: Baking
- Cuisine: American
Description
These Raspberry Jam Thumbprint Cookies feature a buttery, tender base infused with freeze-dried raspberry powder and a sweet, tangy dollop of raspberry jam in the center. Perfectly soft and slightly crumbly, these cookies showcase a delightful balance of fruity and creamy flavors, making them an irresistible treat for any occasion.
Ingredients
Cookie Dough
- 1 cup unsalted butter, softened to room temperature
- ⅔ cup granulated sugar
- 2 egg yolks
- 1 teaspoon vanilla extract
- 2 ¼ cups (280g) all-purpose flour
- ¼ teaspoon kosher salt
- 4 tablespoons freeze dried raspberry powder, sifted (~1 bag of freeze dried raspberries)
Filling
- 10 oz raspberry jam
Instructions
- Cream Butter and Sugar: In a large bowl, use an electric mixer to cream the softened butter and granulated sugar together until the mixture is light and fluffy, which should take about 3 minutes.
- Add Egg Yolks and Vanilla: Mix in the egg yolks and vanilla extract until the batter is smooth and well combined.
- Combine Dry Ingredients: In a separate bowl, whisk together the all-purpose flour, kosher salt, and sifted freeze-dried raspberry powder to evenly distribute the raspberry flavor.
- Mix Dry Into Wet: Gradually add the dry ingredients to the wet mixture in two batches, mixing just until combined to avoid overworking the dough.
- Chill Dough: Cover the dough bowl with plastic wrap and refrigerate for 30 minutes to firm up the dough, making it easier to handle and shaping consistent cookies.
- Preheat Oven and Prepare Pans: Preheat your oven to 350˚F (175˚C). Line two baking sheets with parchment paper to prevent sticking.
- Shape Cookies: Scoop out about a tablespoon of dough and roll it into a ball with your hands, then gently flatten it into a puck shape.
- Create Thumbprint Indentation: Place the shaped dough on the lined baking sheet, then use your pinky or index finger to press a heart-shaped indentation about 3/4 of the way through the dough ball.
- Fill With Jam: Spoon or pipe the raspberry jam into each indentation, filling it almost to the top but not overflowing.
- Chill Again: Return the assembled cookies to the refrigerator for an additional 10-15 minutes to help them maintain their shape during baking.
- Bake: Bake the cookies in the preheated oven for 10-12 minutes, until the bottoms turn a light golden brown. The tops may feel soft but will firm up as the cookies cool.
- Cool: Transfer the baked cookies to a cooling rack and allow them to cool completely before serving to ensure the jam sets and cookies reach optimal texture.
Notes
- Freeze dried raspberry powder adds natural fruit flavor without extra moisture.
- Chilling the dough twice helps keep the cookie shape during baking.
- Use a small spoon or piping bag for neater jam filling.
- These cookies can be stored in an airtight container for up to one week.
- For a festive twist, use mixed berry jam or a different fruit jam of choice.


