
If you have a sweet tooth and want to create a charming, festive treat without fuss, the Easy Homemade Chocolate Easter Eggs (Simple & No-Bake) Recipe is exactly what you need. This delightful recipe lets you craft rich, creamy chocolate eggs that capture the magic of Easter, all without turning on the oven or spending hours in the kitchen. Whether you’re making these for a family gathering or as thoughtful gifts, these chocolate eggs combine smooth chocolate with optional luscious fillings and fun decorations, making every bite a little celebration.
Ingredients You’ll Need
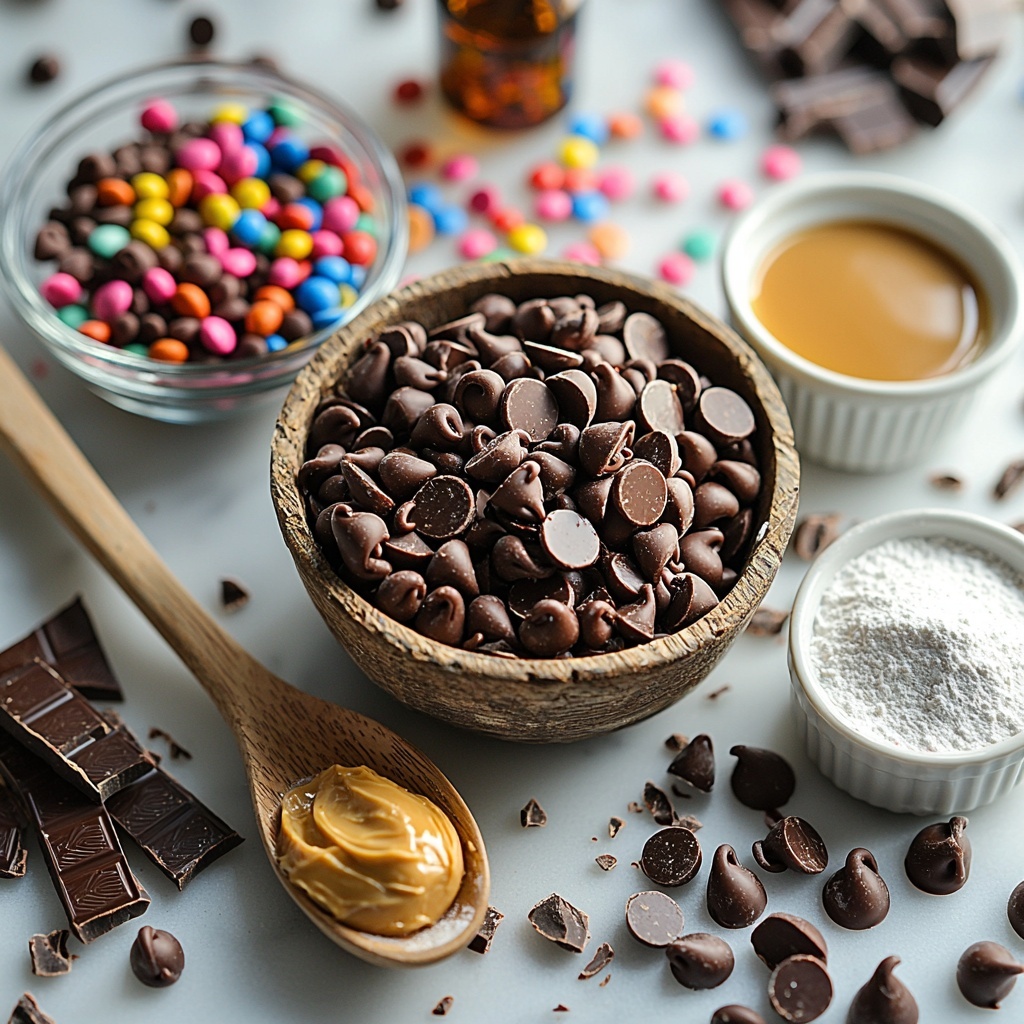
Getting started with this recipe feels like assembling a small treasure trove of flavors and textures, each ingredient selected to build luscious, beautifully shiny chocolate Easter eggs. The ingredients are simple yet essential, contributing to the creamy texture, sweet flavor, and even colorful appeal of your final creation.
- 2 cups high-quality milk or semi-sweet chocolate chips: The star ingredient that provides smoothness and irresistible chocolate flavor.
- 1 tablespoon coconut oil or vegetable shortening: Helps create that glossy finish and smooth melt.
- 1/2 cup creamy peanut butter or chocolate hazelnut spread (optional filling): Adds a rich, creamy surprise inside the eggs.
- 1/4 cup powdered sugar: Sweetens and firms up the peanut butter filling to perfection.
- 1/2 teaspoon vanilla extract (optional): Enhances the depth of flavor in the filling.
- 2 tablespoons colorful sprinkles or crushed candies: Perfect for bright, playful decoration on top.
How to Make Easy Homemade Chocolate Easter Eggs (Simple & No-Bake) Recipe
Step 1: Melt the Chocolate
Begin by gently melting the chocolate chips with the coconut oil in a heatproof bowl set over simmering water, or use the microwave in short 20-second bursts, stirring in between. This process ensures the chocolate is smooth and shiny, which is key to those beautiful, irresistible Easter eggs.
Step 2: Prepare the Filling (If Using)
If you’re opting for a creamy inside, mix the peanut butter, powdered sugar, and vanilla extract in a bowl until the mixture is smooth and slightly firm. This sweet spread adds a lovely texture and balances the rich chocolate beautifully.
Step 3: Coat the Molds
Take silicone egg molds and spoon a small amount of the melted chocolate into each one. Use the back of a spoon to spread the chocolate evenly over the mold’s sides. This step is all about creating a sturdy shell for your eggs. Pop the molds into the fridge for 10 to 15 minutes to let the chocolate set properly.
Step 4: Add the Filling (If Using)
Once the chocolate shells have set, place a dollop of your peanut butter filling into the center of each egg, leaving room around the edges. The shell will encase this creamy surprise for a delicious bite every time.
Step 5: Seal the Eggs
Pour more of the melted chocolate over the filling, smoothing the tops carefully to seal everything inside. Tap the molds gently to release any air bubbles and create an even surface. If you want, sprinkle colorful decorations on top for that festive pop. Refrigerate again for about 20 to 30 minutes until the eggs are completely firm.
Step 6: Remove and Store
Once the chocolate is fully set, carefully pop your homemade Easter eggs out of the silicone molds. Store them in an airtight container in the refrigerator until it’s time to impress your family or guests with these beautiful, tasty treats.
How to Serve Easy Homemade Chocolate Easter Eggs (Simple & No-Bake) Recipe
Garnishes
Dress up your chocolate eggs with extra sprinkles, edible glitter, or even finely chopped nuts for a delightful crunch. Fresh edible flowers can add a surprising touch of elegance if you’re serving these at a special brunch or party.
Side Dishes
Pair these Easter eggs with fresh berries, a scoop of vanilla ice cream, or a dollop of whipped cream to elevate the dessert experience. A cup of tea or coffee also complements the rich, creamy chocolate beautifully.
Creative Ways to Present
Presentation is half the fun! Arrange your homemade chocolate eggs in a rustic basket lined with shredded paper grass or colorful napkins. You can also pack them individually in small clear boxes or organza bags tied with pastel ribbons for charming edible gifts.
Make Ahead and Storage
Storing Leftovers
If you have any delicious leftovers, keep the chocolate eggs in an airtight container in the refrigerator. This ensures they maintain their glossy finish and perfect texture without sweating or melting.
Freezing
You can freeze these eggs for longer storage by wrapping them individually in plastic wrap and placing them in a sealed freezer bag. Thaw gently in the refrigerator when ready to enjoy, preserving their creamy filling and delightful taste.
Reheating
Since this is a no-bake chocolate treat, reheating is best avoided; simply bring the eggs to room temperature before serving if they’ve been refrigerated or frozen. This helps the chocolate soften slightly and the flavors to shine through.
FAQs
Can I use dark chocolate instead of milk or semi-sweet?
Absolutely! Dark chocolate works wonderfully in the Easy Homemade Chocolate Easter Eggs (Simple & No-Bake) Recipe, offering a richer, slightly more bitter taste that pairs beautifully with sweet fillings.
How do I make these eggs vegan?
To make a vegan version, select dairy-free chocolate chips and substitute the filling with a plant-based spread. Coconut oil is perfect as a binding agent and adds that glossy shine.
What if I don’t have silicone molds?
Silicone molds make removal easy and neat, but if you don’t have them, try using small cupcake liners or other flexible molds. Just be extra gentle when unmolding to avoid cracks.
Can I use other fillings besides peanut butter?
Yes! Experiment with caramel, marshmallow cream, cookie butter, or even fruit jams. The Easy Homemade Chocolate Easter Eggs (Simple & No-Bake) Recipe is a great canvas for your favorite fillings.
How long do these chocolate eggs keep?
Stored in the refrigerator, these chocolate eggs stay fresh for up to two weeks. Just make sure they are in an airtight container to prevent absorbing any fridge odors.
Final Thoughts
Making these Easy Homemade Chocolate Easter Eggs (Simple & No-Bake) Recipe is such a joyful experience, blending simplicity and deliciousness in every step. Whether you’re a seasoned baker or a total beginner, this recipe invites you to create something special with ease, offering tasty rewards that everyone will love. So grab your chocolate chips and mold away — your perfect Easter treat awaits!
Print
Easy Homemade Chocolate Easter Eggs (Simple & No-Bake) Recipe
- Prep Time: 20 minutes
- Cook Time: 5 minutes
- Total Time: 25 minutes
- Yield: 12 chocolate eggs
- Category: Dessert
- Method: No-Cook
- Cuisine: American
- Diet: Vegetarian
Description
Delight in these Easy Homemade Chocolate Easter Eggs, a simple and no-bake treat perfect for celebrating the season. Made with rich milk or semi-sweet chocolate and optional creamy peanut butter or chocolate hazelnut filling, these eggs are decorated with colorful sprinkles for a fun festive touch. Ideal for a quick homemade candy project, these eggs set in the fridge and require no baking, making them accessible and enjoyable for all skill levels.
Ingredients
Chocolate Shell
- 2 cups high-quality milk chocolate or semi-sweet chocolate chips
- 1 tablespoon coconut oil or vegetable shortening
Optional Filling
- 1/2 cup creamy peanut butter or chocolate hazelnut spread
- 1/4 cup powdered sugar
- 1/2 teaspoon vanilla extract (optional)
Decoration
- 2 tablespoons colorful sprinkles or crushed candies (optional)
Instructions
- Melt the Chocolate: Combine chocolate chips and coconut oil in a heatproof bowl. Melt over a pot of simmering water or microwave in 20-second intervals, stirring until smooth and glossy.
- Prepare the Filling: If using, mix peanut butter, powdered sugar, and vanilla extract until smooth and slightly firm to create a creamy filling.
- Form Chocolate Shells: Spoon melted chocolate into silicone egg molds, coating the sides thoroughly with the back of a spoon. Refrigerate for 10 to 15 minutes to set the shells.
- Add Filling: Place a small amount of filling into the center of each chocolate shell, sparing space around the edges for sealing with more chocolate.
- Seal and Decorate: Cover filling with additional melted chocolate, smooth the top, tap molds to remove air bubbles, and sprinkle decorations if desired.
- Final Chill: Refrigerate again for 20 to 30 minutes or until fully firm.
- Remove and Store: Carefully pop the eggs from molds and keep them refrigerated in an airtight container until ready to serve.
Notes
- Use dairy-free chocolate to make this recipe vegan.
- Silicone molds make egg removal easy and clean.
- Store the finished chocolate eggs in a cool place to prevent melting.
- Get creative with fillings like caramel, marshmallow cream, or cookie butter for variety.


