
“`html
If you’re on the hunt for a dessert that brings together rich chocolate, velvety cream, and that beloved café charm without a crumb of gluten, then these Gluten Free Tiramisu Brownies for the Ultimate Dessert Delight Recipe are absolutely what you need. Imagine sinking your teeth into fudgy brownies layered with luscious mascarpone cream infused with espresso – it’s a guaranteed crowd-pleaser that feels elegant yet comforting. This recipe transforms familiar ingredients into a decadent treat that’s perfect for celebrations, cozy nights, or anytime you want to impress with something truly special and naturally gluten free.
Ingredients You’ll Need
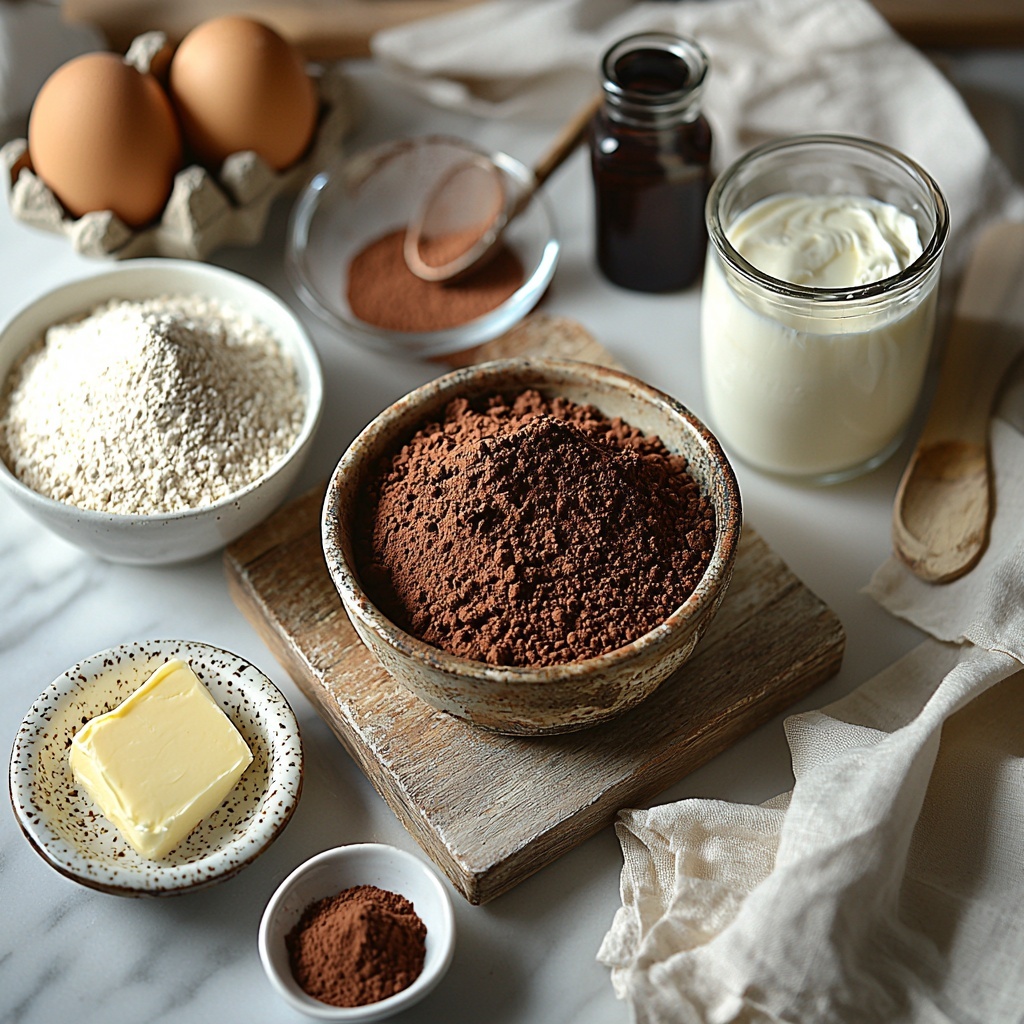
Trust me, the ingredients for this dessert are wonderfully straightforward but each one plays a crucial role in building those irresistible layers of flavor and texture. From the gluten free flour that forms a moist and tender brownie base, to the rich mascarpone cream that creates the perfect silky topping, every element shines through.
- 1 cup Gluten Free Flour: Provides the perfect structure for your brownies, try almond or oat flour variations for different textures.
- 1/2 cup Butter: Adds rich moisture and depth; coconut oil works well for a dairy-free twist.
- 1/3 cup Cocoa Powder: High-quality unsweetened cocoa brings that deeply chocolatey essence.
- 1 cup Granulated Sugar: Sweetens and caramelizes slightly during baking, brown sugar can add warmth.
- 2 large Eggs: Essential for binding and giving the brownies that perfect fudgy texture.
- 1 tablespoon Espresso Powder: Boosts the chocolate flavor with a subtle coffee kick, instant coffee or brewed coffee works too.
- 1 cup Mascarpone Cheese: The star ingredient for that creamy tiramisu layer, cream cheese is an alternative if needed.
- 1 cup Whipping Cream: Whipped to fluffy perfection, full-fat cream is key for richness.
- 1 teaspoon Vanilla Extract: Pure vanilla elevates the overall flavor beautifully.
- 2 tablespoons Cocoa Powder: For dusting and adding that signature tiramisu finish.
How to Make Gluten Free Tiramisu Brownies for the Ultimate Dessert Delight Recipe
Step 1: Mix Your Dry Ingredients
Start by combining the gluten free flour, cocoa powder, granulated sugar, and espresso powder in a large bowl. Stir these dry ingredients well so they’re evenly distributed, which prevents any pockets of flavor from overpowering the brownies later on. This thoughtful mixing lays the foundation for the balanced, rich taste everyone will love.
Step 2: Add in the Butter and Eggs
Next, pour in the melted butter and crack in the eggs. Whisk everything together until you achieve a smooth, glossy batter. You’ll want to whisk for about 3 to 4 minutes, which helps incorporate air for a slightly lighter brownie while maintaining that dense, fudgy texture.
Step 3: Bake the Brownie Base
Preheat your oven to 350°F (175°C). Grease a 9×9-inch baking pan with butter or cooking spray, then spread the batter evenly into the pan. Bake for about 25 minutes; test doneness with a toothpick – a few moist crumbs clinging to it is perfect. Let your brownies cool in the pan for 10 minutes before carefully transferring them to a wire rack so they can cool completely. This cooldown is essential for the mascarpone layer to sit perfectly on top.
Step 4: Whip the Creamy Tiramisu Layer
While the brownies are cooling, it’s time to prepare that luscious topping. In a medium bowl, blend mascarpone cheese, whipping cream, sugar, and vanilla extract. Use an electric mixer on medium speed and whip for 3 to 5 minutes until the mixture is smooth, creamy, and clouds up invitingly. This will be the dreamy, velvety crown of your gluten free tiramisu brownies.
Step 5: Combine and Chill
Once your brownies are completely cool, spread the whipped mascarpone mixture evenly on top using a spatula. The contrast between the rich chocolate and smooth cream is what dreams are made of. Cover the dish with plastic wrap and refrigerate for a minimum of two hours to allow the flavors to meld and the texture to set just right.
Step 6: The Grand Finale
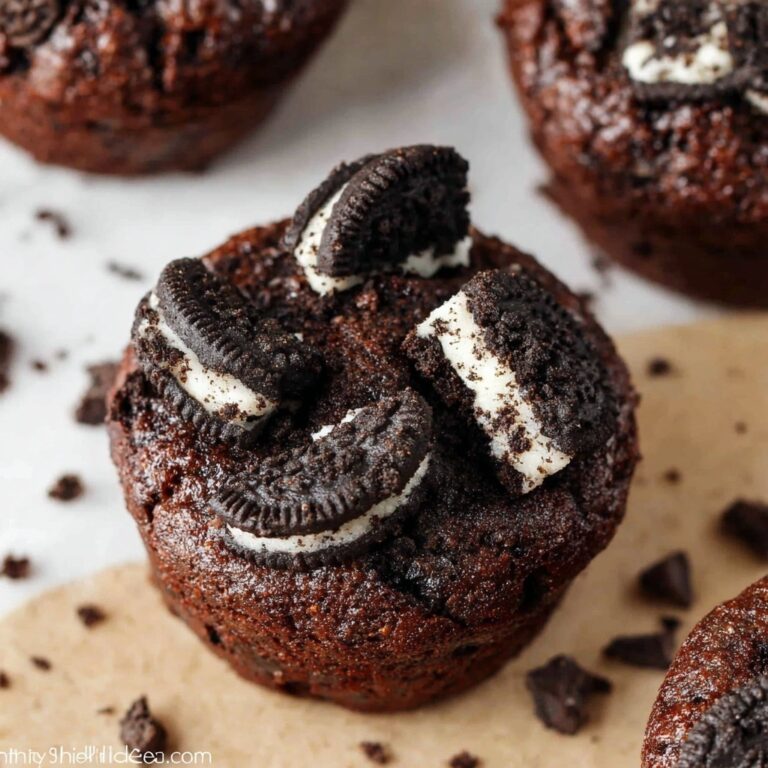
Just before serving, dust the top with cocoa powder through a fine sieve, giving it that signature tiramisu touch. Use a hot knife to slice into neat squares for the cleanest edges – the presentation will be every bit as delightful as the taste.
How to Serve Gluten Free Tiramisu Brownies for the Ultimate Dessert Delight Recipe
Garnishes
Adding a little flourish can make your Gluten Free Tiramisu Brownies for the Ultimate Dessert Delight Recipe truly shine. Try topping each square with a fresh mint leaf, chocolate shavings, or a few coffee beans for an elegant touch. These garnishes complement the espresso flavor while adding visual interest.
Side Dishes
Often, less is more with this dessert since it’s already so rich. A simple cup of freshly brewed espresso or a dollop of whipped cream on the side can be all you need to enhance the experience. Alternatively, a small bowl of fresh berries offers a refreshing counterpoint to the creamy chocolate indulgence.
Creative Ways to Present
For a special occasion, consider serving your brownies in individual glass jars layered with the mascarpone cream and topped with cocoa powder. This makes for a charming portion-controlled treat. Or stack squares with a fork resting elegantly at the plate’s side for a casual but sophisticated look. These small touches make your dessert feel thoughtful and memorable.
Make Ahead and Storage
Storing Leftovers
Because of the creamy topping, it’s best to keep your Gluten Free Tiramisu Brownies for the Ultimate Dessert Delight Recipe refrigerated. Store them in an airtight container, ideally on a single layer to preserve the delicate mascarpone layer. They will stay fresh and delicious for up to 3 days.
Freezing
If you want to enjoy these brownies later, you can freeze them without the mascarpone cream on top. Wrap the brownie base tightly in plastic wrap and place it in a freezer-safe bag or container. Freeze for up to 2 months. Thaw completely before adding the tiramisu layer fresh for best texture.
Reheating
Since tiramisu and cream don’t do well with heat, it’s best served cold or at room temperature. If you prefer a slightly warmed brownie base, briefly microwave only the brownie portion before adding fresh mascarpone topping. This keeps your dessert fresh and fluffy while offering a cozy, warm bite underneath.
FAQs
Can I substitute the mascarpone cheese?
Yes! Cream cheese is the most common substitute if mascarpone isn’t available, though it has a tangier flavor and slightly different texture. Mixing cream cheese with a bit of heavy cream helps mimic mascarpone’s creaminess.
Is this recipe suitable for people with nut allergies?
Absolutely, just ensure that the gluten free flour you use does not contain nuts like almond flour. Oat flour or dedicated gluten free blends labeled nut-free are ideal for this recipe.
Can I use regular flour instead of gluten free flour?
You can experiment with all-purpose flour if gluten isn’t an issue, but this recipe shines as a gluten free dessert option. The texture may be slightly different but still delicious.
How strong should the espresso be?
A strong, rich espresso or instant espresso powder works best to complement the chocolate without overpowering the sweetness. If you don’t have espresso powder, brewed strong coffee is a great alternative.
What’s the best way to get clean brownie slices?
Warm your knife under hot water before slicing, wiping it dry each time. This prevents the creamy layer from sticking and allows you to cut neat, beautiful squares that hold their shape perfectly.
Final Thoughts
Go ahead and treat yourself to these stunning Gluten Free Tiramisu Brownies for the Ultimate Dessert Delight Recipe – they effortlessly combine rich chocolate and luscious cream into a dessert you’ll want to make again and again. Whether you’re celebrating a special occasion or simply craving an indulgent snack, these brownies bring warmth, flavor, and happiness to every bite. I promise, once you try them, this recipe will become a cherished favorite in your gluten free dessert repertoire.
“`
Print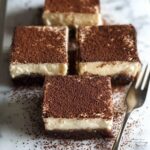
Gluten Free Tiramisu Brownies for the Ultimate Dessert Delight Recipe
- Prep Time: 25 minutes
- Cook Time: 25 minutes
- Total Time: 2 hours 45 minutes
- Yield: 16 servings
- Category: Dessert
- Method: Baking
- Cuisine: Italian-American
- Diet: Gluten Free
Description
Delight in these decadent Gluten Free Tiramisu Brownies combining the rich, fudgy texture of chocolate brownies with the creamy, coffee-infused tiramisu topping. Perfect for those craving a sophisticated dessert that’s gluten free without sacrificing flavor or indulgence.
Ingredients
Brownie Base
- 1 cup Gluten Free Flour (Substitute with almond flour or oat flour for different textures)
- 1/3 cup Cocoa Powder (Use high-quality unsweetened cocoa for best results)
- 1 cup Granulated Sugar (Can be replaced with brown sugar for a deeper flavor)
- 1 tablespoon Espresso Powder (Instant coffee or strong brewed coffee can be used instead)
- 1/2 cup Butter, melted (Coconut oil can be used as a dairy-free alternative)
- 2 large Eggs (No direct substitutes recommended for the best texture)
Tiramisu Layer
- 1 cup Mascarpone Cheese (Cream cheese can be used as a substitute, though flavor may vary)
- 1 cup Whipping Cream (Use full-fat for the best texture)
- 1 teaspoon Vanilla Extract (Pure vanilla is recommended for optimal results)
- 2 tablespoons Cocoa Powder (For dusting and finishing)
Instructions
- Mix dry ingredients. In a large mixing bowl, combine gluten-free flour, cocoa powder, granulated sugar, and espresso powder. Stir well to evenly distribute all dry ingredients.
- Add wet ingredients and combine. Add melted butter and eggs to the dry mixture and whisk together until the batter is smooth and glossy, about 3-4 minutes.
- Preheat oven and bake brownies. Preheat your oven to 350°F (175°C). Grease a 9×9-inch baking pan with butter or cooking spray, pour the batter evenly into the pan, and bake for 25 minutes or until a toothpick inserted in the center comes out with a few moist crumbs. Cool in pan for 10 minutes, then transfer to a wire rack to cool completely.
- Prepare tiramisu cream. In a medium bowl, combine mascarpone cheese, whipping cream, vanilla extract, and sugar. Using an electric mixer on medium speed, whip the mixture until smooth and creamy, about 3-5 minutes.
- Assemble tiramisu topping. Once the brownies are fully cooled, gently spread the mascarpone cream evenly over the top using a spatula.
- Chill the assembled dessert. Cover the brownies with plastic wrap and refrigerate for at least 2 hours to allow the flavors to meld and the topping to set.
- Finish and serve. Before serving, dust the top generously with cocoa powder through a fine sieve. Slice the brownies into squares with a hot knife for clean edges and enjoy.
Notes
- You can substitute almond or oat flour if you want a different gluten free flour texture, but be aware it may alter the final texture slightly.
- Coconut oil is a great dairy-free butter substitute but may impart a slight coconut flavor.
- Using instant espresso powder enhances the coffee flavor without adding liquid; strong brewed coffee can be used but reduce other liquids slightly if needed.
- Ensure brownies are completely cool before adding the tiramisu layer to prevent melting.
- For best results, use full-fat mascarpone and whipping cream to achieve a creamy, rich topping.
- Refrigerating the dessert is essential to set the tiramisu layer firmly and enhance the overall flavor.
- Dust cocoa powder just before serving to maintain a fresh, visually appealing finish.
- For clean brownie cuts, dip your knife in hot water and wipe dry before slicing to get neat edges.


