
If you’re on the lookout for a vibrant and irresistible dish that brings together hearty flavors with fresh crunch, this Chickpea Feta Salad Recipe is exactly what you need. It’s a wonderfully satisfying salad bursting with colorful textures and bold tastes, combining protein-packed chickpeas and creamy feta cheese with a zesty dressing and crisp veggies. Whether you want a quick lunch, a side for dinner, or a party dish that will wow your guests, this salad promises to be a favorite you’ll return to time and again.
Ingredients You’ll Need
Getting started with your Chickpea Feta Salad Recipe is a breeze because the ingredients are simple, fresh, and thoughtfully chosen to create that perfect balance of flavor and texture. Each one plays a special role, from the creamy tang of feta to the satisfying bite of chickpeas, and the crunchy, fresh vegetables that brighten the dish.
- Chickpeas: The star ingredient, full of fiber and protein, providing a hearty, nutty base for the salad.
- Feta Cheese: Adds a crumbly, slightly salty creaminess that complements the chickpeas beautifully.
- Cucumber: Offers a refreshing, crisp texture to lighten and brighten every bite.
- Cherry Tomatoes: Bursting with juiciness and a touch of sweetness, they bring vibrant color and flavor.
- Red Onion: Adds a mild sharpness and a bit of a bite without overpowering the salad.
- Kalamata Olives: Provide a briny, savory depth that enhances the Mediterranean vibe.
- Fresh Parsley: Brings herbal brightness and an inviting fresh aroma.
- Lemon Juice: Offers a zesty punch that ties all the flavors together.
- Extra Virgin Olive Oil: For richness and to meld the dressing ingredients perfectly.
- Dried Oregano: Classic Mediterranean seasoning to boost flavor without overpowering freshness.
- Salt and Pepper: To taste, because seasoning is everything!
How to Make Chickpea Feta Salad Recipe
Step 1: Prep Your Ingredients
Start by rinsing and draining your chickpeas well, then pat them dry to avoid sogginess. Dice the cucumber and cherry tomatoes into bite-size pieces. Finely chop the red onion and parsley. Crumble the feta cheese so it’s ready to distribute evenly throughout the salad. Having everything prepped makes assembly quick and enjoyable.
Step 2: Mix the Dressing
In a small bowl, whisk together fresh lemon juice, extra virgin olive oil, dried oregano, salt, and pepper. This simple yet vibrant dressing is what brings the salad to life by infusing every ingredient with zesty, herbaceous flavor. The acidity from the lemon juice perfectly balances the creaminess of the feta and the earthiness of the chickpeas.
Step 3: Combine Everything
In a large bowl, gently toss the chickpeas, chopped veggies, olives, parsley, and crumbled feta. Pour the dressing over the mixture and stir delicately so that every element is coated but still maintains its texture and shape. This is where the magic really happens as all components come together harmoniously.
Step 4: Chill and Serve
Let the salad rest in the fridge for at least 30 minutes before serving. Chilling allows the flavors to meld and deepen, creating a more cohesive and delicious taste experience. This salad shines when it has a little time to marinate, so if you can prepare it ahead, even better!
How to Serve Chickpea Feta Salad Recipe
Garnishes
To elevate the presentation and flavor, sprinkle extra crumbled feta on top along with a few whole Kalamata olives. Add a few torn fresh mint or basil leaves for an unexpected aromatic twist that livens up the salad just before serving.
Side Dishes
This Chickpea Feta Salad Recipe pairs exquisitely with warm pita bread, grilled chicken, or even roasted vegetables. Its versatility allows it to shine alongside almost any Mediterranean-inspired main course or as part of a larger mezze spread.
Creative Ways to Present
For a fun twist, serve this salad stuffed inside crispy pita pockets or scoop it on toasted baguette slices as a vibrant bruschetta. You can also layer it in mason jars for a beautiful, portable lunch option that looks as good as it tastes.
Make Ahead and Storage
Storing Leftovers
Keep any leftover Chickpea Feta Salad Recipe in an airtight container in the refrigerator for up to 3 days. The flavors continue to develop but the fresh texture of the vegetables remains inviting, making it perfect for next-day lunches or snacks.
Freezing
Because this salad is packed with fresh vegetables and cheese, freezing is not recommended. Feta and cucumbers can change texture when frozen, so it’s best enjoyed fresh or refrigerated in the short term.
Reheating
This salad is best served cold or at room temperature. If you’ve refrigerated leftovers, simply take it out a little before eating so it can warm slightly for full flavor and texture enjoyment. It does not require reheating in the traditional sense.
FAQs
Can I use canned chickpeas for this salad?
Absolutely! Canned chickpeas are a convenient time-saver. Just be sure to rinse and drain them thoroughly to remove any excess salt or canning liquid, which keeps the salad fresh and clean-tasting.
Is this salad suitable for vegans?
This recipe includes feta cheese, so it is not vegan as is. However, you can swap the feta with a plant-based cheese alternative or simply omit it for a tasty vegan-friendly version.
How long does the Chickpea Feta Salad stay fresh?
When stored properly in an airtight container in the fridge, the salad stays fresh and flavorful for up to 3 days. The ingredients maintain their texture well within this time frame.
Can I add other vegetables to this salad?
Definitely! Feel free to customize with bell peppers, radishes, or even avocado slices for extra creaminess. The Chickpea Feta Salad Recipe is flexible and welcomes your personal touch.
What kind of olives work best in this salad?
Kalamata olives are the classic choice for their robust flavor and Mediterranean character. However, you can substitute with black or green olives based on your preference or availability.
Final Thoughts
This Chickpea Feta Salad Recipe is a refreshing and wholesome dish that brightens up any table with its delightful combination of flavors and textures. It’s a joy to make, easy to customize, and guaranteed to bring a smile to everyone’s face. I encourage you to give it a try, invite your friends or family over, and watch this salad become one of your all-time favorite go-to recipes!
Print
Delicious Recipe
- Prep Time: 15 minutes
- Cook Time: 0 minutes
- Total Time: 15 minutes
- Yield: 12 servings
- Category: Appetizer
- Method: No-Cook
- Cuisine: American
Description
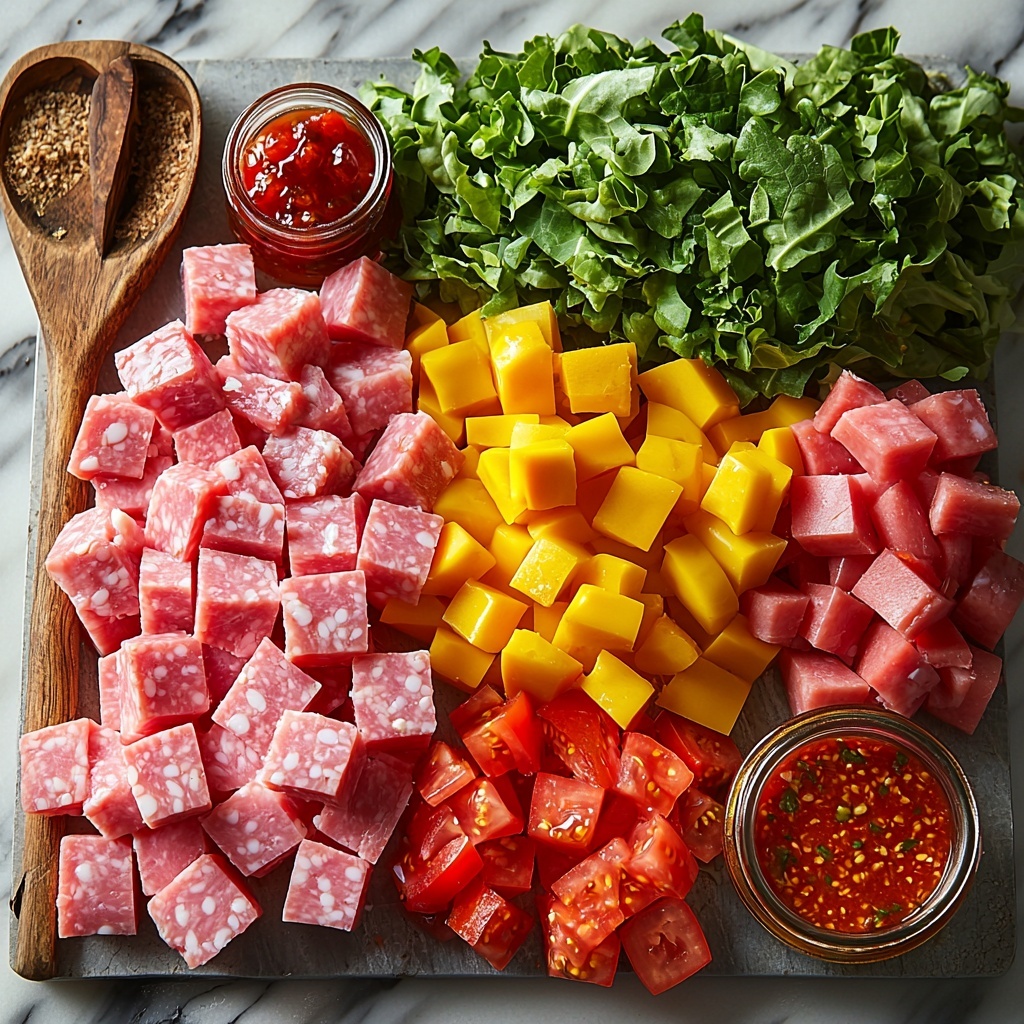
Hoagie Dip is a flavorful layered salad-style dip that combines finely diced deli meats, cheese, fresh vegetables, and a tangy Italian-inspired dressing. Perfect for parties and gatherings, this easy-to-make dip can be prepared ahead and improves with marinating time in the fridge, delivering a delicious combination of savory, tangy, and fresh flavors.
Ingredients
Meats and Cheese
- 4 ounces Ham
- 4 ounces Pepperoni
- 4 ounces Salami
- 4 ounces Provolone cheese
Vegetables
- 1 head Iceberg lettuce
- 1 large Tomato
- 1 ounce Banana Peppers
Dressing
- ¾ cup Mayonnaise
- 3 tablespoons Red wine vinegar
- 1 tablespoon Olive oil
- 1 tablespoon Italian seasoning
- 1 ounce Hoagie Spread (also called Hot pepper relish or Hots)
Instructions
- Prepare Ingredients: Finely dice the ham, pepperoni, salami, and provolone cheese. Cut the tomato in half and use a spoon to remove the pulp and seeds to prevent excess liquid, then finely dice the tomato. Finely dice the iceberg lettuce and banana peppers as well. Combine all these prepared ingredients in a large bowl.
- Make Dressing: In a separate bowl, whisk together the mayonnaise, red wine vinegar, olive oil, Italian seasoning, and hoagie spread until well combined, forming the flavorful dressing for the dip.
- Combine Dip: Pour the dressing over the diced meats, cheese, and vegetables. Use a large spoon to gently fold the mixture, ensuring all ingredients are evenly coated with the dressing and combined without mashing the ingredients.
- Chill and Serve: Transfer the dip to the refrigerator and chill until ready to serve. For best flavor, let the dip marinate for up to 24 hours before serving, allowing the flavors to meld beautifully.
Notes
- Removing tomato seeds and pulp helps prevent the dip from becoming watery.
- This dip improves in flavor the longer it marinates, so prepare ahead for best results.
- Serve chilled with crackers, chips, or toasted baguette slices for an easy appetizer.
- Adjust Italian seasoning and hoagie spread quantities to taste based on spice preference.


